Sydney’s Medical Facilities
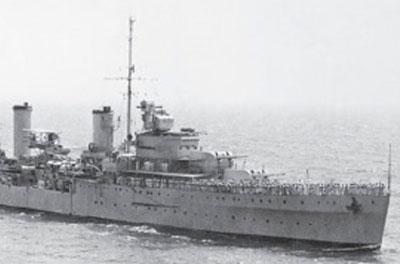
It is necessary to describe Sydney’s medical facilities, in order to provide context. The dental surgery was located in the bridge superstructure, in a somewhat odd location next to the captain and navigator’s sea cabin. The sickbay was used as the Main Dressing Station in action. It was located two decks below the dental surgery. The Auxiliary Dressing Station was right aft another deck below, in the Warrant Officer’s Mess. In action, first aid personnel drawn from the cooks and stewards were also based in the Petty Officer’s pantry and the half-deck space, on the wardroom deck level.
There were also three damage control bases, with the aft one co-located with the after first aid post. What would be called Damage Control Central (DCC) today, was located in the lower steering position, two decks below the sickbay.
The Action
The Germans indicated that Kormoran opened fire when Sydney was abeam or just abaft her starboard side, on a parallel course, at a range of only 1500 metres. Kormoran’s first target was Sydney’s bridge, followed by her forward turrets. Soon after Kormoran’s guns opened fire, she hit Sydney’s bows with a torpedo, which made the forward part of the ship sit lower in the water.
The Germans then stated that Sydney turned to port in an apparent attempt to ram. This meant Kormoran’s gunfire remained targeted on the forward half of the ship. Sydney passed astern of Kormoran, opening her starboard side to German gunfire. As night fell, Sydney slowly disappeared over the horizon at about five knots. The glow from her fires was last seen at about 2300.
Meanwhile Sydney hit Kormoran in the engine room, causing a fire which could not be controlled. Kormoran was abandoned at about 2100, although the last of her crew did not leave the ship until midnight, after setting scuttling charges. She blew up and sank half an hour later.
Kormoran was armed with six 150mm guns, of which four could bear on either side of the ship. She also had two 37mm anti-tank guns, five 20mm guns, four torpedo tubes, 400 mines, and a reconnaissance aircraft. The key consideration for the damage inflicted on Sydney was the 150mm guns, which fired high explosive (HE) and armour-piercing (AP) rounds. Both shell types weighed about 45kg. The HE shells contained about 4.5kg of explosive, generated about 4000 fragments per shell, and caused damage within a 3 metre radius, and injuries within a 5 metre radius. The AP shells had about 1kg of explosive, generated much fewer but larger fragments per shell, with damage and injuries within smaller radii. Based on the footage from MV Geosounder when she found Sydney in March 2008, DSTO found at least 87 150mm shell hits, resulting in about 200,000 red-hot frags travelling up to 1200 m/sec. This is equivalent to 300 frags per crew member, and does not include secondary fragments from the ship’s structure. To put Kormoran’s gunpower into context, this is a photo of a blown out bulkhead during DSTO trials aboard ex HMAS Derwent in 1994. This damage was caused by a stationary 4.5 kg cased charge, while Kormoran’s shells were moving at nearly 700m/sec.
DSTO estimated that Sydney received 41 150mm shell hits on the port side, and 46 on the starboard. DSTO also assessed the orange areas as fire-damaged.
DSTO also assessed Sydney did not sink on losing her bows, but that the bows were lost as a result of her sinking. It can be seen that if Sydney’s crew was at action stations when the battle started, the medics in the sickbay and the forward and midship DC parties would have had little chance.
This wreck photo shows the sickbay area, indicated by the mooring fairlead and boarding ladder. The item humped over the top of the fairlead is a degaussing cable fitted after the outbreak of war. It can be seen that the superstructure above (including the dental surgery two decks above the sickbay) has been totally wrecked. This is probably where up to half of the sickbay staff met their fate. This photo shows the quarterdeck, with the wardroom underneath on the port side.
This is what the area looks like today. Although shell damage is minimal, the quarterdeck was crushed downwards by water pressure as the ship sank. The wardroom deck below is most likely the area used to treat casualties following the loss of the sickbay forward.
HMAS Sydney – aft section – download PDF to view This DSTO diagram shows the likely pattern of Sydney’s damage. It can be seen that the sickbay and the forward and midships DC parties were hard hit from Kormoran’s heavy guns. It can also be seen that even the aft DC party and first aid post probably would have sustained some casualties. The grey areas show small-calibre damage, and it can be seen these targeted Sydney’s bridge and four inch gun deck. The torpedo damage caused considerable flooding forward.
This DSTO diagram indicated where Sydney sustained her casualties, which would have stemmed both from direct weapons effects, and additional fire and smoke casualties from a lack of escape routes.
DSTO estimate that Sydney sustained a minimum of 70% casualties, or about 450 men. A maritime casualty prediction algorithm suggests that half (225) were KIA and about the same WIA. The latter would have included 207 P1 and P2 cases, half of whom would have had severe burns. This DSTO diagram shows the DC problem confronted by Sydney’s crew. Much of the forward end of the ship was flooded and on fire, with men trapped below. Although there were fewer fires and no flooding aft, the after engineering spaces would have been full of smoke and the rest of the ship would have been only somewhat better.
By late evening the sea was starting to get up. This DSTO graphic shows how Sydney was on fire amidships, down by the bows and listing to port, She would also have been rolling between 15 and 40 degrees.
This meant progressive flooding through shell holes forward that would otherwise have been above water. The fires would have limited the ability to stop the flooding, and it is also likely that damage to the fire main forward meant that only the aft hose points were available. Furthermore, any water used for fire fighting would have exacerbated the flooding. It should be stressed that the real situation would have been far worse: no moon, pitch dark apart from emergency lighting and torches, wind about 20 knots and lots of white horses. Unless any of the forward first aid party made it aft, there probably only would have been a maximum of five unwounded medics and perhaps up to five unwounded first aiders in the wardroom and aft DC station. If the SMO was in DCC and the junior MO was in the sickbay, this would have left only the dentist in charge aft. Providing first aid for up to 200 casualties in a smoke-filled ship rolling up to 40o would have been horrendous; trying to treat them on the upper deck would probably have meant losing them over the side. If the ship sank with little or no warning, it is therefore likely that the medics and their casualties were all caught below in the WOs mess and wardroom. It also seems likely that the engineering and DC parties would also have had little or no chance to escape. It therefore seems likely that very few able-bodied men would have made it off the ship.
Sydney’s Boats
At the time of her loss Sydney had eight boats and nine Carley floats, giving a total lifesaving capacity of only 616 people (29 short). Only two boats were in davits while the rest required an electrically-driven crane to get them into the water. Their primary role was as workboats rather than lifeboats. None of Sydney’s boats could stay afloat if they were holed.
Of the nine boats, five were found with the wreck.
IMAGE: Carley Floats – download PDF to view
Carley floats were canvas-covered metal pontoons, with slatted wooden platforms that dropped down either way they ended up in the water. This meant the survivors were always in – not on – the water, at least up to their waists.
Carley Float
Sydney had two large and seven small Carley floats, weighing 410 or 175 kg respectively. Getting them into the water in the first place therefore posed some challenges. Only two of the small floats were ever found, including one off Christmas Island two and a half months later, with a body in it. This compares with postwar evidence that only 10% of Carley floats got off their ship.
Sydney’s Carley floats were rated for either 67 or 20 survivors (half of whom would have been outside the float, hanging on to the lifelines). It should also be noted that the floats did not include food, water or any other survival equipment. RN data suggests that any Sydney survivors were therefore unlikely to survive on a Carley float for more than three to five days. Sydney’s Lifebelts The Admiralty Pattern 14120 lifebelt had a single bladder and manual inflation. It had a flotation capacity of 4.3kg, compared to the modern Pattern 50N (16.4 kg) and the Special Duties lifejacket (22.4 kg).
This example from the Australian War Memorial shows that the rubber bladder had a stockingette cover.
Officers could also buy a waistcoat with a similar rubber bladder built-in, with similar flotation capacity.
Despite its name, the Admiralty Pattern 14120 life belt was not meant to be worn around the waist – otherwise it could flip the wearer upside down and drown him. When worn properly, it was to be positioned as high as possible below the armpits, however it provided no head support and (unlike modern lifejackets), it was never designed to flip unconscious wearers face up. This meant higher sea states made drowning more likely. Although the water temperature off Shark Bay (23-24oC) made hypothermia unlikely, the estimated survival time for the Sydney survivors using these lifebelts was probably no more than a few hours.
After the Sinking
The first outside evidence of the battle came when some Kormoran survivors were picked up by the troopship Aquitania en route to Sydney on 23 November, however she was unable to inform anyone ashore until she reached Wilson’s Promontory four days later. The first report to reach the shore was on 24 November, when more Kormoran survivors were picked up by the tanker Trocus.
Air searches commenced later that day, five days after the battle. Although they covered the right area, the searches were initially flown at about 1500 feet, which would have been fine for a visual search for the ship, but not for her survivors, who would have needed them to be at about 500 feet. Although later sorties were flown at a lower heights looking for boats (finding only those from Kormoran), no searches were flown low enough to spot small debris items, survivors or bodies. Dead bodies initially sink: it is the gases from decomposition that make them float three to ten days later. However this takes longer if the water is cold, and in deep water the water pressure prevents the gas from expanding sufficiently to make bodies float. The search was called off on 29 November, most likely before any bodies had a chance to surface.
Conclusion
In summary, any medical staff in Sydney’s sickbay at the time the action began were unlikely to have survived Kormoran’s fire directed at the bridge above them. Any medics who made it aft to the wardroom would have been overwhelmed by about 200 P1 and P2 casualties, half of whom would have had severe burns. The list and increasing sea state that evening would have prevented caring for them on the quarterdeck, which meant most if not all were probably caught below with the surviving damage control parties and engineers when the ship sank. Survival time in the water for any survivors was probably only a few hours wearing a lifebelt, and three to five days in a Carley float. Air searches did not begin until five days after the sinking, and were not flown low enough to find survivors or debris in the water before they were called off.